
Want to jump right to it? Try the demos!
Make sure you have a WebVR-enabled browser. In Chromium, enable the flags for chrome://flags/#enable-webvr and chrome://flags/#enable-gamepad-extensions. Firefox support is coming soon.
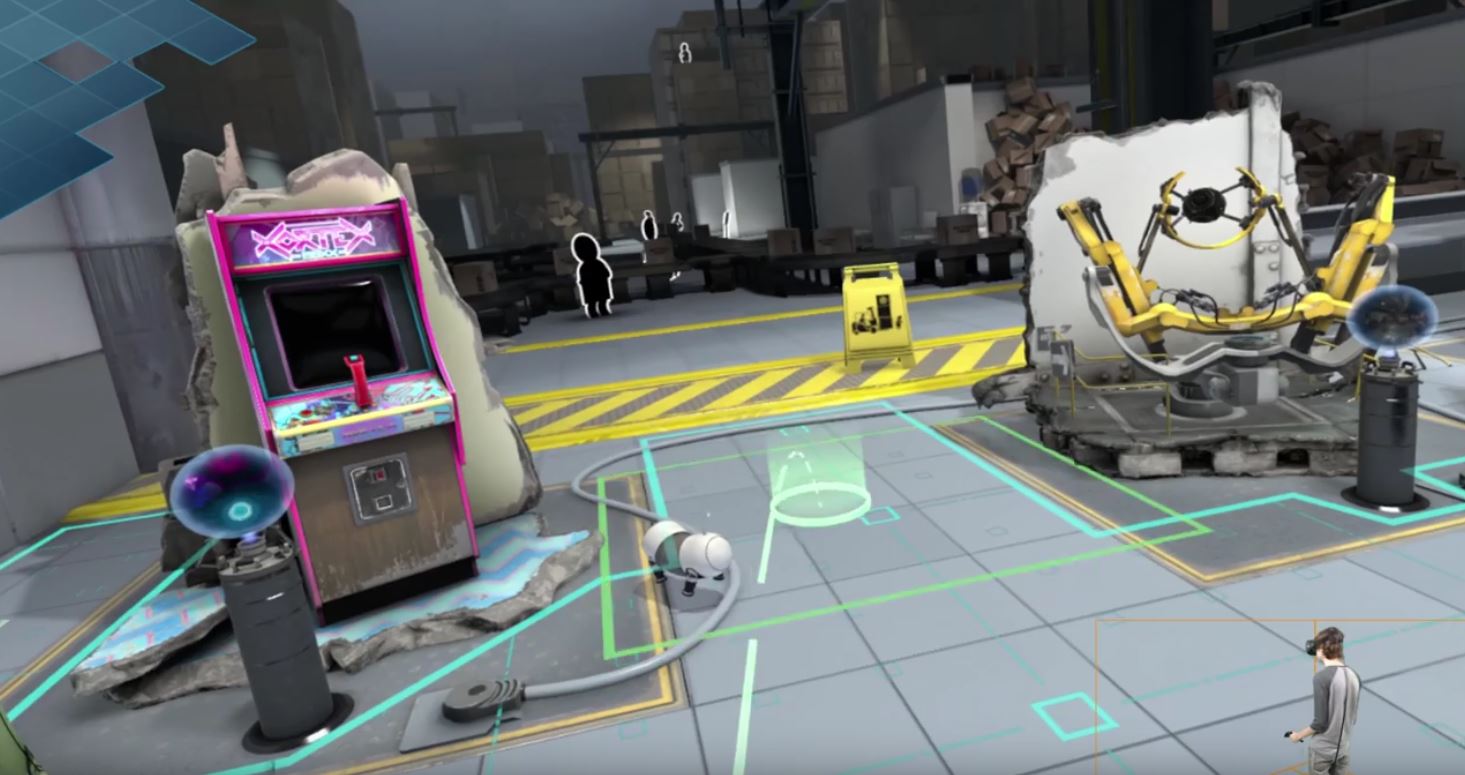
The HTC Vive introduced room-scale VR, letting users walk around naturally in the virtual space. While compelling, experiences are constrained to the available physical space of a few meters. In The Lab, Valve introduced a system to select a distant point and teleport there instantaneously, allowing you to explore large virtual spaces without physical boundaries.
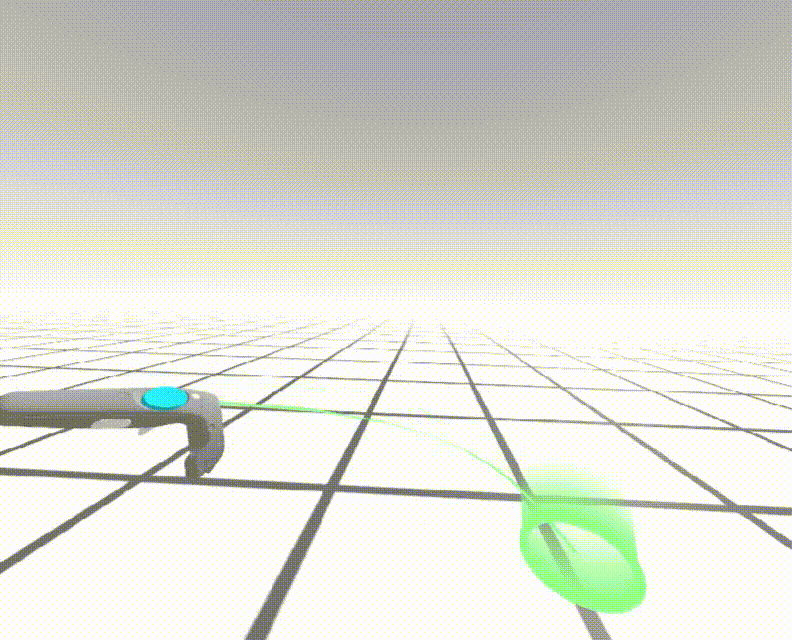
Today, we're releasing an A-Frame teleport component so you can easily use this technique in your experiences. The idea is simple: when holding the thumbpad, a line is displayed between you and the place you want to go. Move your hand to change the target position and release to teleport!
Just include the component, and then the teleport HTML attribute is all it takes to enable teleportation in your experience:
<a-entity vive-controls="hand: left" teleport-controls></a-entity>Creating a Curved Trajectory
The first version of the component used a straight line to select the destination.
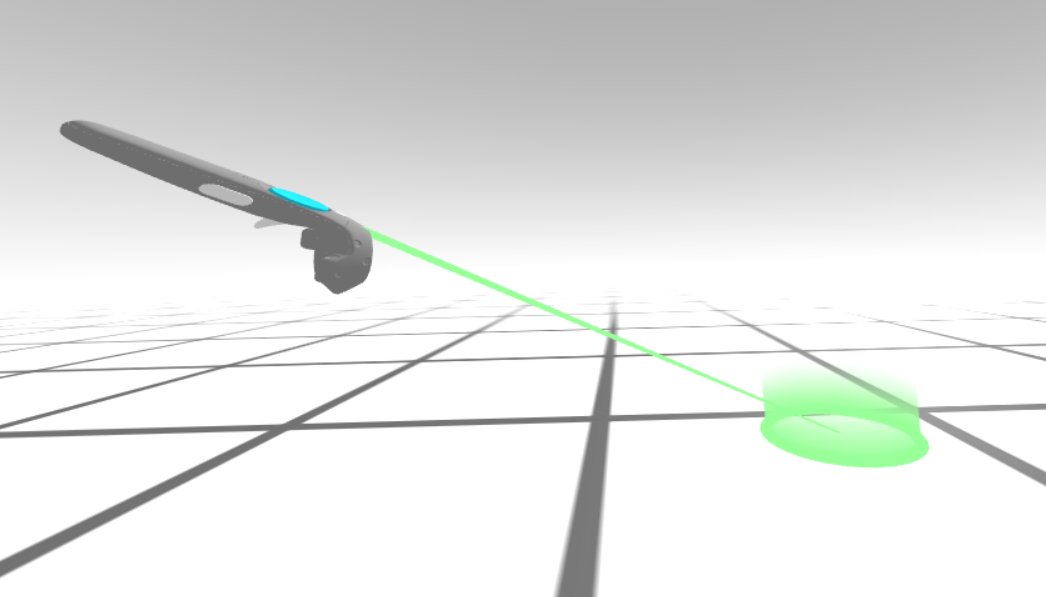
Using a straight ray works only when there's a direct line of sight between you and your target destination. For instance, if you want to move to a higher position, you won't be able to point accurately with a straight line.
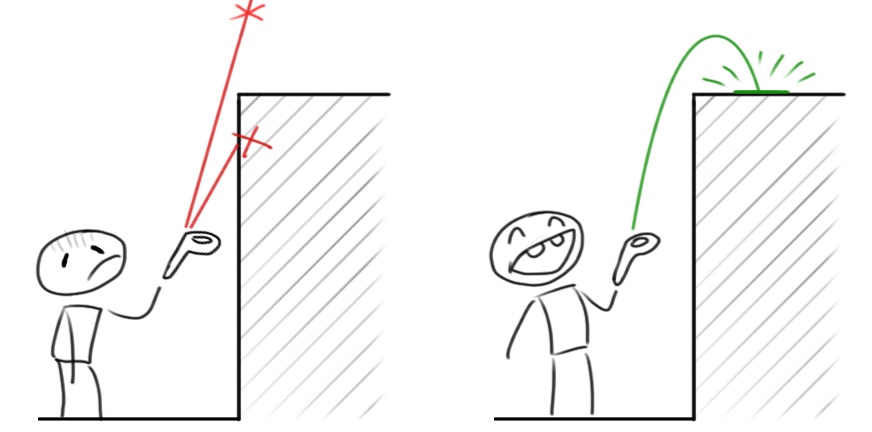
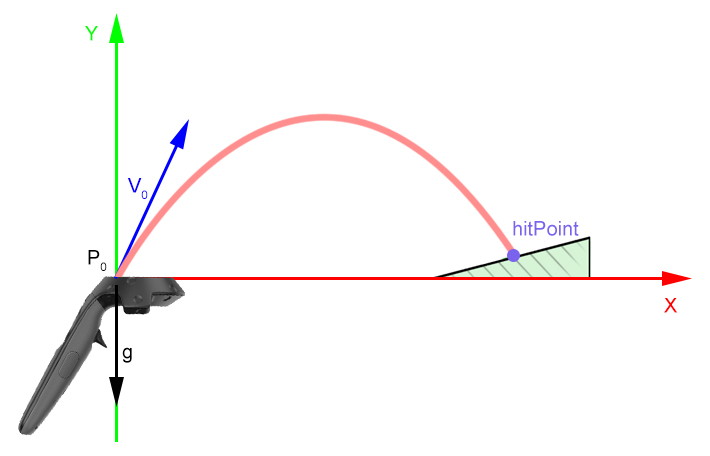
The solution is to use a curved line to select an occluded target destination. We use simple physics to determine a projectile shot curve:
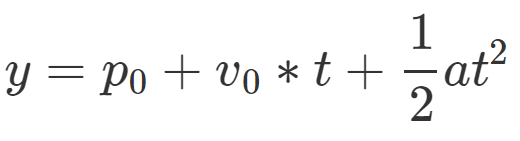
where:
- p0 (initial position) is the initial position of the projectile. It is the controller position when the teleport button is pressed.
- v0 (initial speed) is the speed at p0. Defined by the user, the higher the speed, the farther the distance.
- t (time) is the time since shot.
- a (acceleration) with gravity at 9.8m/s2.
To paint the curve, we create an auxiliary Mesh class called RayCurve. Its constructor takes the number of points in the curve and a width value. Then you keep calling setPoint(i, Vector3) to define each point on the curve. It creates a triangleStrip mesh with two vertices for each point on the curve, perpendicular to the direction of the line.
Detecting Collisions
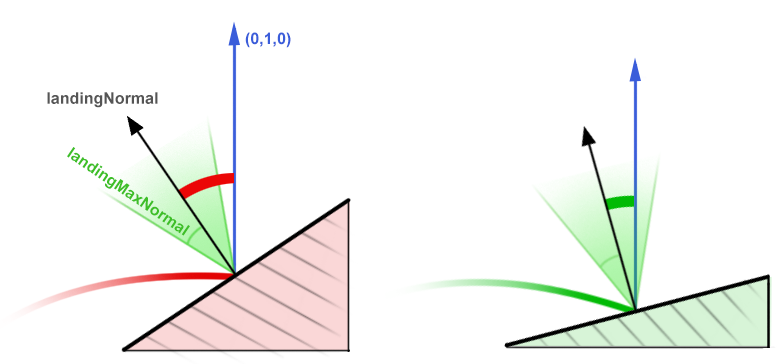
By default, we detect collisions against the floor (a plane at the origin (0, 0, 0) with the normal pointing up (0, 1, 0)), but you can define which entities to collide against. In both cases, we use a raycaster that moves along the segments in the curve's path, checking for collisions within the distance between them.
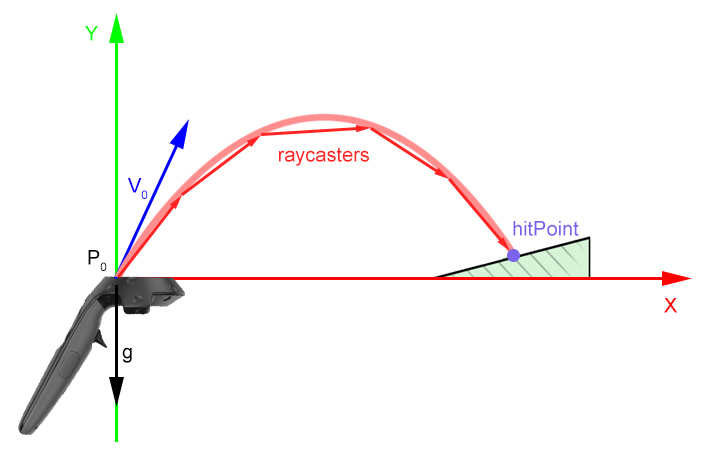
If the raycaster detects a collision, an entity will be placed at the target destination where the user will be teleported. If you don't provide an entity, the component will create a cylinder with a gradient texture. When the user releases the button, the user (camera and controllers) will be teleported to the destination point.
Here's the pseudocode that shows how the curve painting and collision flows work:
lastPoint = p0;
hitPoint = null;
hit = false;
for (i = 0 to numCurvePoints) {
  // Get the next point on the curve.
  nextPoint = parabolicCurve(p0, v0, a, i);

  // Add it to the curve mesh.
  curve.addPoint(i, nextPoint);

  // Set up raycaster between next and previous point and run hit test.
  raycaster.setFromSegment(lastPoint, nextPoint);
  hitPoint = raycaster.intersect(collisionEntity)
  if (hitPoint && validCollision(hitPoint)) {
    hit = true;
    break;
  }
}
To prevent the user from teleporting over steep surfaces, such as walls, we use the validCollision() function. validCollision() checks if the angle between the face normal where the raycaster hit and the default ground normal (defined by the user, defaulting to UP=(0, 1, 0)) is under a defined max angle.
Using Events
The teleport component depends on the tracked-controls component to handle the controller position, orientation, and button events. The default button to activate the teleport is the thumbpad, so we added listeners for two button events:
- thumbpadDown will activate and make the teleportation curve (which is generated on each
tick) visible. - thumbpadUp will calculate the new position for the camera and perform the teleportation if intersecting with a collidable entity.
The teleport component will also emit a 'teleported' event that contains the 'oldCamPosition', 'newCamPosition', and 'hitPoint' each time the user teleports.
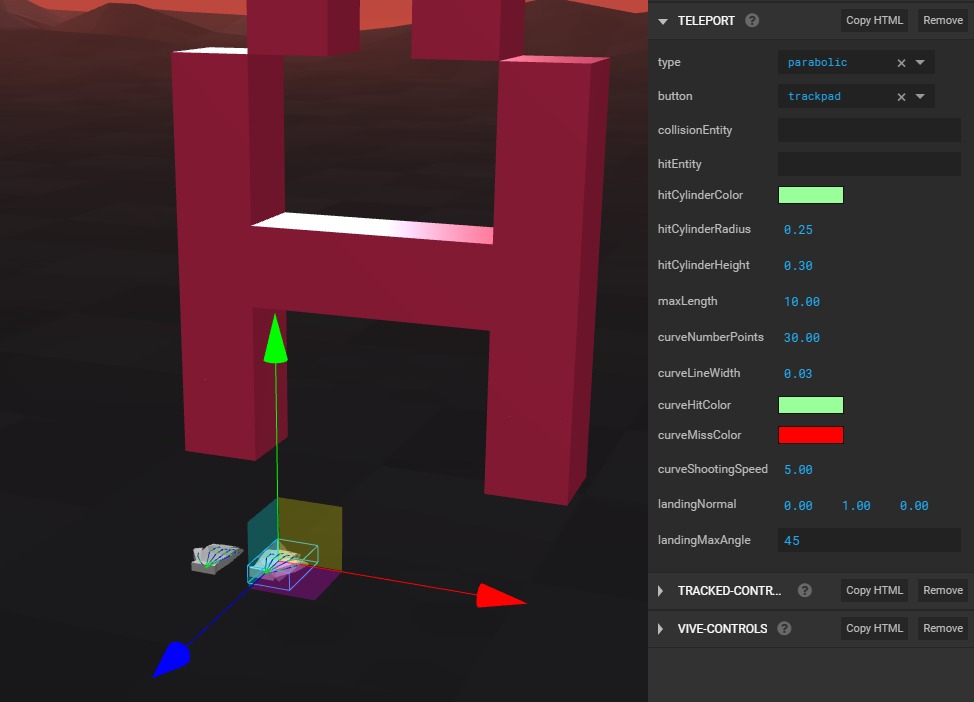
Customizing with Properties
The teleport component has several properties to customize its appearance and behavior:
- type: Type of teleportation,
lineorparabolic. - button: Which button to press to teleport.
- collisionEntity: Selector of the mesh used to check for collisions. If no value provided, the plane
Y=0is used. - hitEntity: Entity to show at the intersection point of the target destination. If none is provided, a cylinder is used.
- hitCylinderColor: Color used for the default
hitEntityprimitives. - hitCylinderRadius: Radius used for the default
hitEntityprimitives. - curveHitColor: Color used when the curve is intersecting a collidable entity.
- curveMissColor: Color used when the curve is not intersecting a collidable entity.
- curveNumberPoints: Number of points used in the curve.
- curveLineWidth: Line width of the curve.
- curveShootingSpeed: Curve shooting speed. The bigger the value, the farther the distance.
- maxLength: Max length of the ray when using
type: lineteleportation. - landingNormal: Normal vector to detect collisions with the
collisionEntity. - landingMaxAngle: Angle threshold (in degrees) used together with
landingNormalto detect the maximum steepness of a surface that can be teleported to.
Using the Teleport Component in Your Experience
Using the component in an already existing A-Frame experience is straightforward. Just include a <script> tag containing the URL of the component:
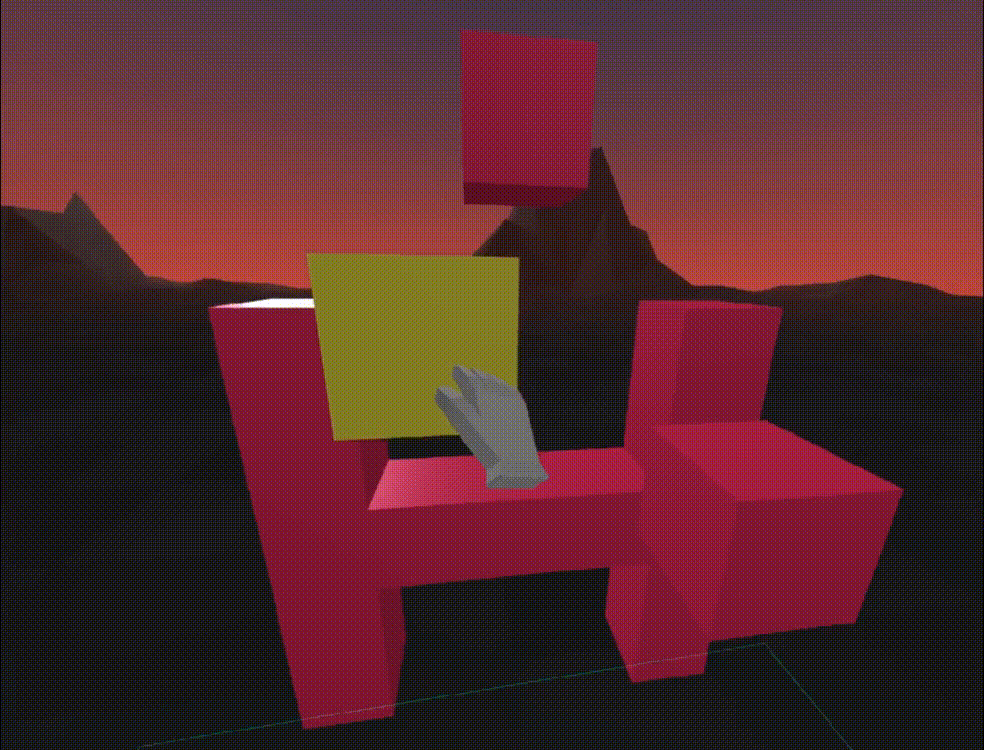
<script src="https://unpkg.com/aframe-teleport-controls/dist/aframe-teleport-controls.min.js"></script>Then plug in the teleport-controls component to your controller entities. For example, here's how to add the teleport component to both hands in A-Painter:
<a-entity id="left-hand"
  brush
  paint-controls="hand: left"
  ui
  teleport-controls>
</a-entity>
<a-entity id="right-hand"
  brush
  paint-controls="hand: right"
  ui
  teleport-controls>
</a-entity>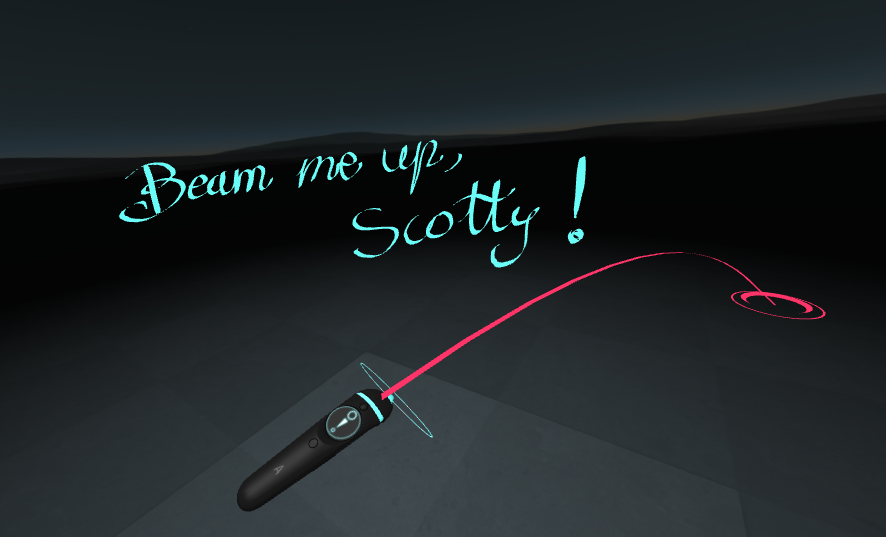
From the Inspector
You can also use the Inspector to add the teleport component to an existing scene:
- Press
<ctrl> + <alt> + iwithin an A-Frame scene running in the browser to launch the Inspector. - Select your controllers entities from the Scene Graph.
- Go to the right-hand entity panel and add the
teleport-controlscomponent fromAdd Component. - Hit the
Esckey to return to the scene. - Enjoy teleporting around the scene!
Perhaps We Could…
Some possible ideas and features:
- Add an effect when performing the teleportation. A simple fade-in-and-out effect would work.
- Define the minimum time between teleportations.
- Let the user jump to any kind of surface without testing the normals. For example, teleport to the roof and orient the camera accordingly.
Please feel free to contribute ideas, code, or issues at https://github.com/fernandojsg/aframe-teleport-controls.